
If you’ve ever bought an iMac, you’ve inevitably had the same thought as me at some point during its lifespan… ‘I wonder if it can be wall mounted’…
Perhaps its out of sheer boredom, or perhaps its my manly instincts to just know what possibilities are available for my machine. But I’ll leave that to you to decide.
There are a number of different references around the world wide web possibly suggesting that my machine can be wall mounted, but I’ve never had a clear cut answer. Hence the reason for this post. I will summarise what ranges can be wall mounted, and also identify the correct accessories for these models to get it on your wall, if you choose to do so.
Starting with the basics… Some of the iMac and Aluminium Cinema Displays can be wall mounted, but naturally, they cannot be mounted with a standard TV mount, as the hinge mechanism simply won’t attach to them. Which is why there is a need for the VESA mounting plate (otherwise known as the VESA wall mount)

There are different versions of the VESA mount, so make sure you order the right one, but below are the details on which can be mounted using the VESA brackets. (please note, the VESA mount is just an adapter. You will still need a TV wall mount or bracket that complies to the standard 100mmm x 100mm attachment dimensions)
(please note, the following titles are by Apples specifications. If you are unsure of which range you have, use TheBookYard Serial Number Decoder to identify your model)
Of the Cinema Displays, the following can be wall mounted:
•Apple Cinema Display (20-inch DVI)
•Apple Cinema Display (23-inch DVI)
•Apple Cinema HD Display (30-inch DVI)
•Cinema Display (20-inch DVI Late 2005)
•Cinema Display (23-inch DVI Late 2005)
•Cinema Display (30-inch DVI Late 2005)
•Cinema Display (30-inch DVI Late 2007)
•Apple Cinema HD Display (30-inch DVI)
•Apple Cinema Display 30-inch Early 2007
•Cinema Display (20-inch DVI Early 2007)
•Cinema Display (23-inch DVI Early 2007)
•Cinema Display (30-inch DVI Early 2007)
•24-inch LED Cinema Display
•27-inch LED Cinema Display
•27-inch Apple Thunderbolt Display
Of the iMac ranges, the following can be wall mounted:
•iMac G5 (17-inch)
•iMac G5 (20-inch)
•iMac G5 ALS (17-inch)
•iMac G5 ALS (20-inch)
•24-inch Aluminium iMac (Mid 2007, Early 2008, and Early 2009)
•27-inch Aluminium iMac (late 2009, mid 2010, and mid 2011)
Bearing in mind that each one of the machines above mount in one of 3 different ways (which are described below), please ensure compatibility before buying what you need.
For starters, we’ll begin with the original White iMac ranges.
These require 4 parts to fit the VESA mount with the corresponding Apple part numbers (finding where to buy them is another matter entirely unfortunately, as this range is now discontinued… but you may get lucky by searching ebay):
• 2 part VESA Rubber Bumper Kit (922-6589)
• VESA Adapter/Tongue (922-6635)
• VESA Wall Mount (922-6625)
• 2x Long VESA Screws (922-6626)
The rubber bumpers sit between the VESA and the rear housing unit to protect the casing, the tongue (or adapter) needs to be fitted to the internal hinge where the leg would normally attach to (so it requires opening up the machine), and the wall mount is then attached to the tongue with the two long screws.
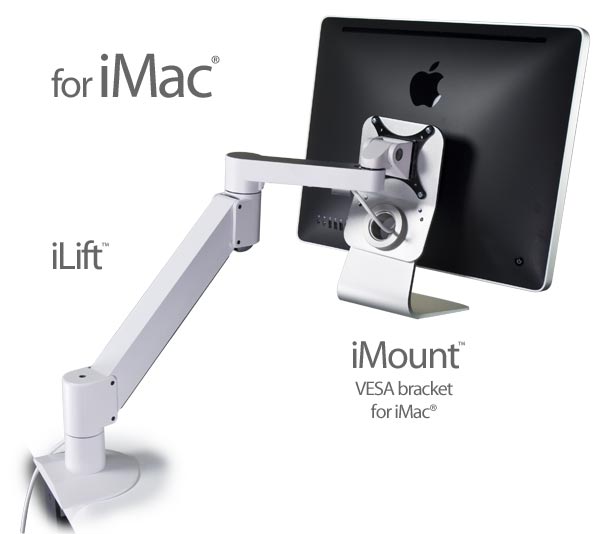
For these earlier models that require opening the machine to fit an adapter, there is an external casing alternative, such as the iMount, which can be found on smartdesks.com if you don’t fancy the labour intensive route to fit the VESA adapter.
The Aluminium Cinema display models are a simpler fitting process, but require a slightly different kit:
• 2 part VESA Rubber Bumper Kit (922-6588)
• VESA Wall Mount (922-6625)
• 2x Long VESA Screws (922-6626) for 20/23″ DVI. or 2x Short VESA Screws (922-6627) for 30″ DVI models
These ranges don’t require a complete rebuild, and are very straight forward to fit.
Moving onto the first of the Aluminium iMac ranges, you can use the non VESA version, as with the White iMac ranges (such as the iMount), but the ranges mentioned above are very simple to fit. (this covers the 24″ Aluminium iMac 07/08/09 and 27″ Aluminium iMac 09/10/11)
All you need is the following kit, and the machine does not require being opened, as it is all done from the outside of the machine.
To open the iMac, use either a business card, or a thin bit of plastic up the rear of the iMac, as shown below

Simply lean the iMac all the way forward, push the card in until you feel a spring move (the card usually needs to go in at the same angle as the legs vertical angle), then push the iMac screen further forward until it clicks and all the screws are exposed.
Then use the following kit to wall mount it.
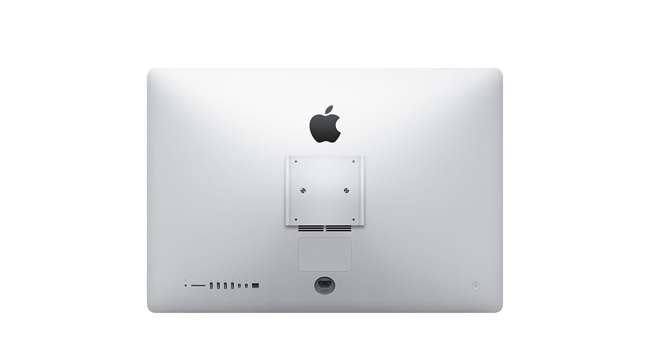
Finally, the last range to be covered is the very latest models. The 2012 and 2013 27″ and 21.5″ iMac ranges. (this configuration works the same up to 2019, but different part numbers are required)
Who knows why they decided not to allow the same simple spring mechanism of the earlier Aluminium iMacs to make it externally wall mountable, but they made it so you either have to select the machine as wall mountable upon purchase from Apple, or rebuild the machine in a similar way to the earlier White iMac ranges. But you’ll require the following kit:
• VESA Wall Mount with 2x VESA Screws (21.5″ 923-0421) (27″ 923-0424)
• VESA Hinge Bracket (21.5″ 923-0419) (27″ 922-0422)
• VESA Adapter/Tongue (21.5″ 923-0420) (27″ 923-0423)
• iMac VHB Display Tape Kit With Replacement Tool Wheel (21.5″ 076-1437) (27″ 076-1419)
• iMac Display Removal Tool Handle (076-1416)
Because of the way they designed the body, you cannot open the machine without tearing the VHB display tape, so you will need to replace the tape when you refit the LCD unit.
For the rest of the iMac ranges that have not been mentioned, the only option is a leg mounting option, such as the iMount mentioned above (photo below), so there are always options for wall mounting your iMac. After this, you can use either an extending arm, or a standard TV wall bracket.
I hope this proves useful to those of you that, like myself, like to know how things work and what can be done if you get bored of your iMac just sitting on your desk… But just be aware of the time it will take (on some of the above methods) to get it done.
All the part numbers shown above should be on our website at TheBookYard.com, but if they are not, please contact us and the relevant links can be emailed through to you. If you have any thoughts or alternatives, please let me know, as I’d be interested to see what other options are out there that I haven’t covered here.

(please note, the VESA mount is just an adapter. You will still need a TV wall mount or bracket that complies to the standard 100mmm x 100mm … wamount.wordpress.com